
こんにちはコーヤです。
このページでは、SwiftUIで図形の枠線を表示する方法をご紹介します。
以下のバージョンで動作確認しています。
- Xcode 13.4.1
- Swift 5.6.1
枠線の設定方法
.stroke(枠線の色, lineWidth: 枠線の太さ)
struct ContentView: View {
    var body: some View {
        Rectangle()
            .stroke(Color.blue, lineWidth: 5)
            .frame(width: 300, height: 200)
    }
}
枠線を破線にする方法
破線にする
.stroke(枠線の色, style: StrokeStyle(lineWidth: 枠線の太さ, dash: [破線の長さ, 空白の長さ, 破線の長さ, 空白の長さ, ... 破線の長さ, 空白の長さ ]))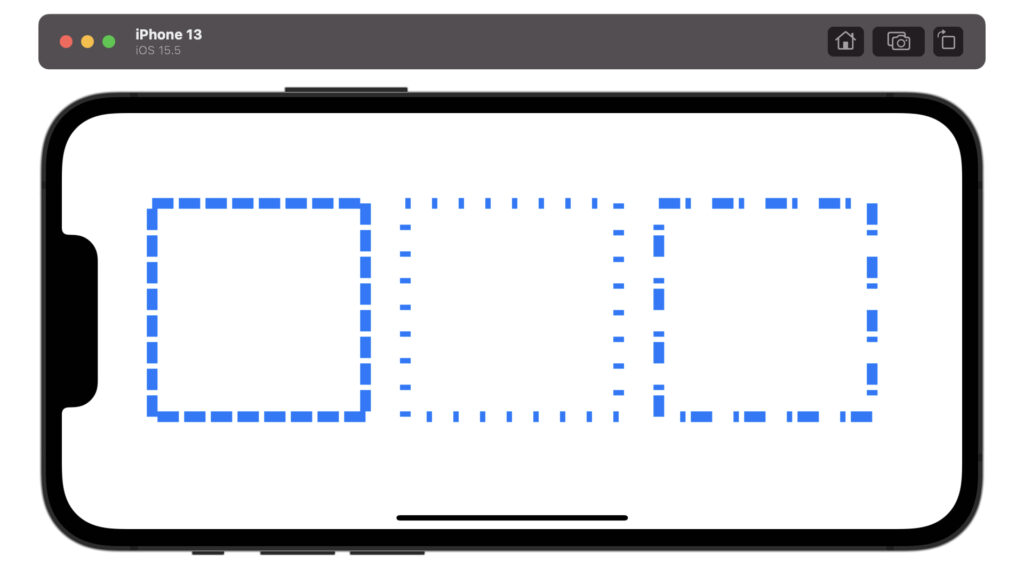
struct ContentView: View {
    var body: some View {
        HStack {
            Spacer()
            Rectangle()
                .stroke(Color.blue, style: StrokeStyle(lineWidth: 10, dash: [20, 5]))
                .frame(width: 200, height: 200)
            Spacer()
            Rectangle()
                .stroke(Color.blue, style: StrokeStyle(lineWidth: 10, dash: [5, 20]))
                .frame(width: 200, height: 200)
            Spacer()
            Rectangle()
                .stroke(Color.blue, style: StrokeStyle(lineWidth: 10, dash: [20, 5, 5, 20]))
                .frame(width: 200, height: 200)
            Spacer()
        }
    }
}
破線の開始位置を設定する
.stroke(枠線の色, style: StrokeStyle(lineWidth: 枠線の太さ, dash: [破線の長さ, 空白の長さ], dashPhase: 破線の開始位置))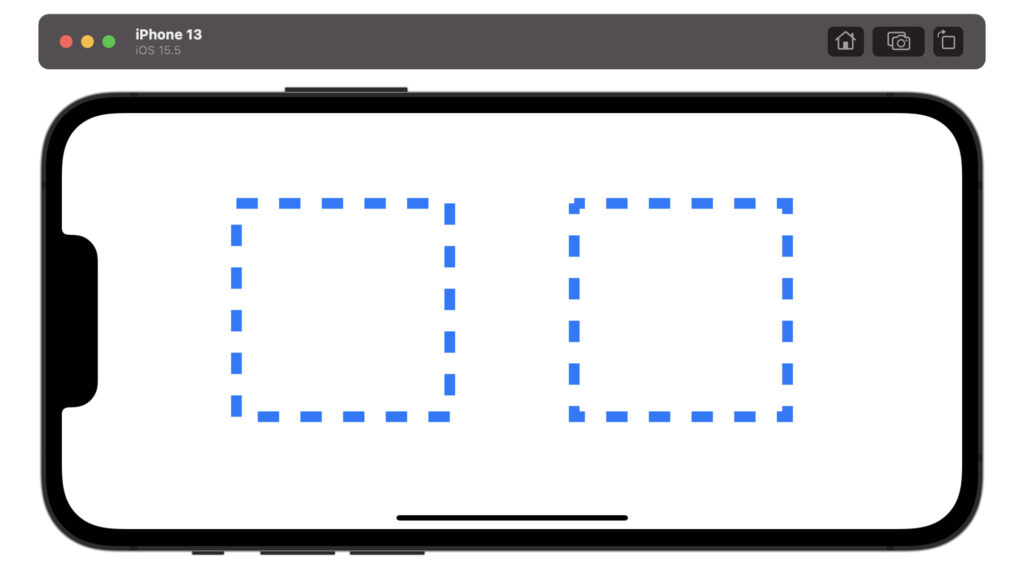
struct ContentView: View {
    var body: some View {
        HStack {
            Spacer()
            Rectangle()
                .stroke(Color.blue, style: StrokeStyle(lineWidth: 10, dash: [20, 20], dashPhase: 0))
                .frame(width: 200, height: 200)
            Spacer()
            Rectangle()
                .stroke(Color.blue, style: StrokeStyle(lineWidth: 10, dash: [20, 20], dashPhase: 10))
                .frame(width: 200, height: 200)
            Spacer()
        }
    }
}
破線の端の形状を設定する
破線の先端の形状を設定できます。
buttは調整なしです。squareは四角く調整します。roundは丸く調整します。調整は線の長さを伸ばしつつ調整するので、もともとの破線より若干長くなります。
.stroke(枠線の色, style: StrokeStyle(lineWidth: 枠線の太さ, lineCap: 破線の端の形状, dash: [破線の長さ, 空白の長さ]))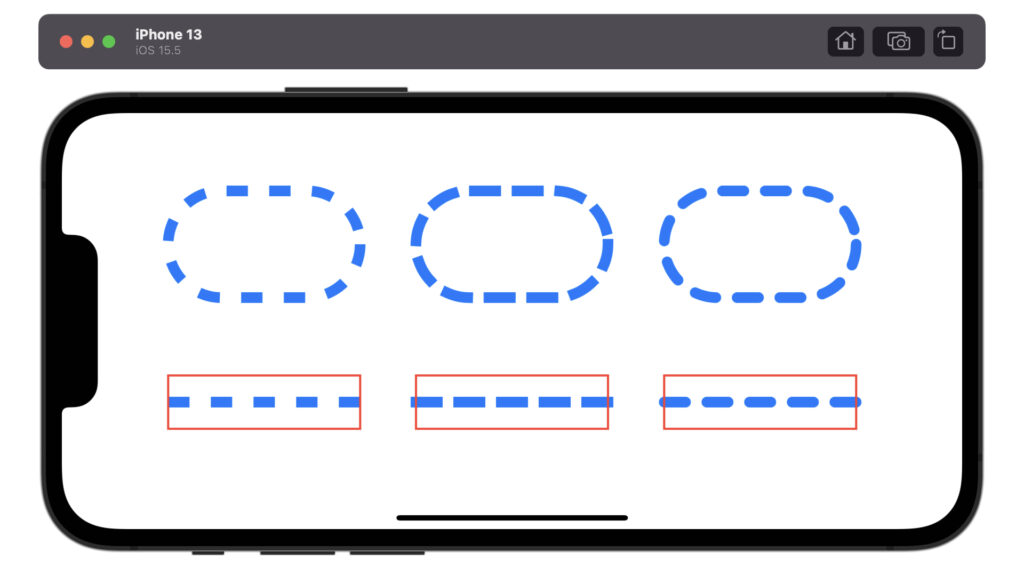
struct ContentView: View {
    var body: some View {
        HStack {
            Spacer()
            VStack {
                Spacer()
                Capsule()
                    .stroke(Color.blue, style: StrokeStyle(lineWidth: 10, lineCap: .butt, dash: [20, 20]))
                    .frame(width: 180, height: 100)
                Spacer()
                ZStack {
                    Path { path in
                        path.move(to: CGPoint(x: 0, y: 25))
                        path.addLine(to: CGPoint(x: 180, y: 25))
                    }
                    .stroke(Color.blue, style: StrokeStyle(lineWidth: 10, lineCap: .butt, dash: [20, 20]))
                    .frame(width: 180, height: 50)
                    Rectangle()
                        .stroke(Color.red, lineWidth: 2)
                        .frame(width: 180, height: 50)
                }
                Spacer()
            }
            Spacer()
            VStack {
                Spacer()
                Capsule()
                    .stroke(Color.blue, style: StrokeStyle(lineWidth: 10, lineCap: .square, dash: [20, 20]))
                    .frame(width: 180, height: 100)
                Spacer()
                ZStack {
                    Path { path in
                        path.move(to: CGPoint(x: 0, y: 25))
                        path.addLine(to: CGPoint(x: 180, y: 25))
                    }
                    .stroke(Color.blue, style: StrokeStyle(lineWidth: 10, lineCap: .square, dash: [20, 20]))
                    .frame(width: 180, height: 50)
                    Rectangle()
                        .stroke(Color.red, lineWidth: 2)
                        .frame(width: 180, height: 50)
                }
                Spacer()
            }
            Spacer()
            VStack {
                Spacer()
                Capsule()
                    .stroke(Color.blue, style: StrokeStyle(lineWidth: 10, lineCap: .round, dash: [20, 20]))
                    .frame(width: 180, height: 100)
                Spacer()
                ZStack {
                    Path { path in
                        path.move(to: CGPoint(x: 0, y: 25))
                        path.addLine(to: CGPoint(x: 180, y: 25))
                    }
                    .stroke(Color.blue, style: StrokeStyle(lineWidth: 10, lineCap: .round, dash: [20, 20]))
                    .frame(width: 180, height: 50)
                    Rectangle()
                        .stroke(Color.red, lineWidth: 2)
                        .frame(width: 180, height: 50)
                }
                Spacer()
            }
            Spacer()
        }
    }
}
枠線の接続部の設定方法
枠線の接続部の形状を設定できます。
miterは鋭角な形状です。roundは丸い形状です。bevelはmiterの尖った部分を切り落とした形状です。
.stroke(枠線の色, style: StrokeStyle(lineWidth: 枠線の太さ, lineJoin: 枠線の接続部の形状))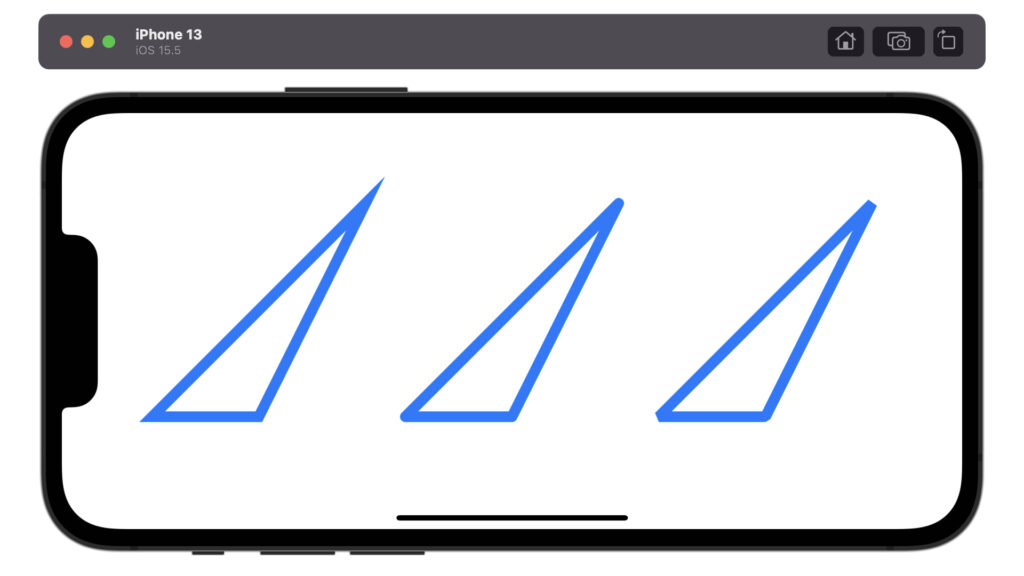
struct ContentView: View {
    var body: some View {
        HStack {
            Spacer()
            SampleShape()
                .stroke(Color.blue, style: StrokeStyle(lineWidth: 10, lineJoin: .miter))
                .frame(width: 200, height: 200)
            Spacer()
            SampleShape()
                .stroke(Color.blue, style: StrokeStyle(lineWidth: 10, lineJoin: .round))
                .frame(width: 200, height: 200)
            Spacer()
            SampleShape()
                .stroke(Color.blue, style: StrokeStyle(lineWidth: 10, lineJoin: .bevel))
                .frame(width: 200, height: 200)
            Spacer()
        }
    }
}

struct SampleShape: Shape {
    func path(in rect: CGRect) -> Path {
        Path { path in
            path.move(to: CGPoint(x: 0, y: rect.maxY))
            path.addLine(to: CGPoint(x: rect.midX, y: rect.maxY))
            path.addLine(to: CGPoint(x: rect.maxX, y: rect.minY))
            path.closeSubpath()
        }
    }
}
枠線の太さに応じて図形の大きさを調整する方法
太い枠線を使用するとフレームからはみ出ている感じが目立ちます。
枠線込みで範囲内に収めるように図形を小さく調整するにはstrokeBorderを使います。
.strokeBorder(枠線の色, lineWidth: 枠線の太さ)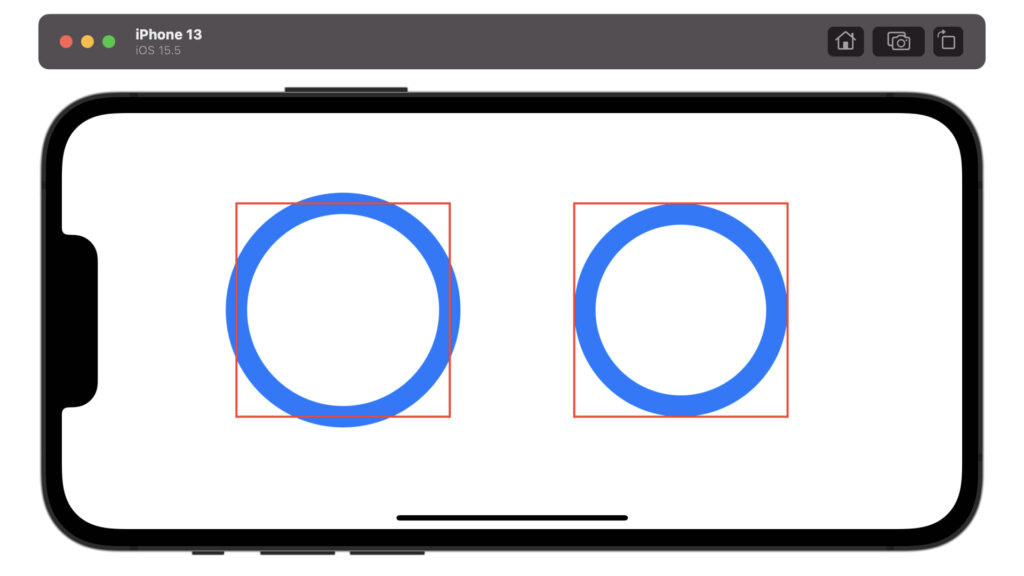
struct ContentView: View {
    var body: some View {
        HStack {
            Spacer()
            ZStack {
                Circle()
                    .stroke(Color.blue, lineWidth: 20)
                    .frame(width: 200, height: 200)
                Rectangle()
                    .stroke(Color.red, lineWidth: 2)
                    .frame(width: 200, height: 200)
            }
            Spacer()
            ZStack {
                Circle()
                    .strokeBorder(Color.blue, lineWidth: 20)
                    .frame(width: 200, height: 200)
                Rectangle()
                    .stroke(Color.red, lineWidth: 2)
                    .frame(width: 200, height: 200)
            }
            Spacer()
        }
    }
}
以上です。ご参考になれば幸いです。
コメント欄